Manual
Skinetic Device Settings
To enable haptic feedback using the Skinetic SDK, the first step is to set up a Skinetic device to connect to.
This can be done by creating a new Data Asset of class Skinetic Device (located in Miscellaneous/Data Asset).
Skinetic Device Overview
The SkineticDevice asset serves as the interface to the haptic rendering layer.
It also abstracts the target platform of your project: developing an application for android, is the same as for windows.
This component allows you to perform several kinds of actions:
- Device configuration
- Scan available devices
- Handle connection to a Skinetic device
- Control the device’s global rendering state
- Introspect the current device details
- Handle the Global boost
Configuration

First setting available is the Connection Type:
Classicis the default and recommended mode of connection with Skinetic.Experimentalis an experimental set of features, allowing you to connect to audio devices via USB.
In Classic mode, the device asset allows the configuration of the preferred type of output (Bluetooth, USB, Wifi, or autodetection by the device on which the game is running).
As it is a Data Asset, several can be configured in advance to ease the development.
The device used to play on has to be chosen among existing assets in Project Settings → Plugins → Skinetic → Default Device.
For Experimental mode usage, see Skinetic Device Settings - Experimental mode section
Scanning procedure
Each Skinetic Device is identified by a unique Serial Number.
To connect to a specific device, this Serial Number can be retrieved from the Asset:
ScanDeviceswill start an asynchronous task scanning all devices available with the connection type requested.ScanStatusreturns the status of the scanning procedure or an error code.GetScannedDevicesreturns a list of devices to which it is possible to connect with the preferred connection type set in the asset.
Example: launching the scan and waiting for it to be completed
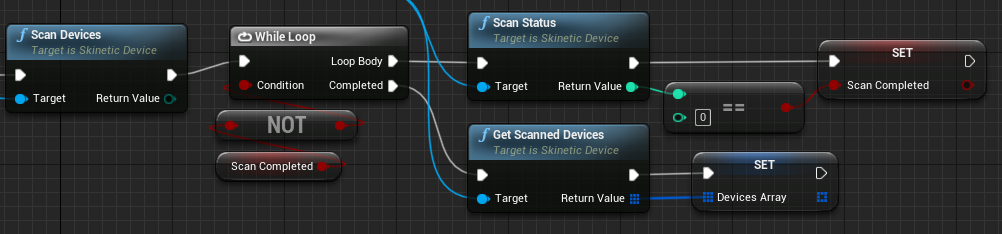
As Bluetooth scanning can be quite slow, this loop will probably hit Unreal's infinite loop limit. A good practice would be to put a delay in the loop before retrieving the scan status.
Connection
To handle connection and disconnection:
In any blueprint (eg. Game Mode or Level Blueprint), get the reference of the default device with the GetDefaultDevice blueprint node
then manage the connection process with Connect/ConnectToSpecificDevice (passing a Serial Number as argument) or Disconnect.
The preferred connection method can also be set at runtime before the connection with SetPreferredConnection.
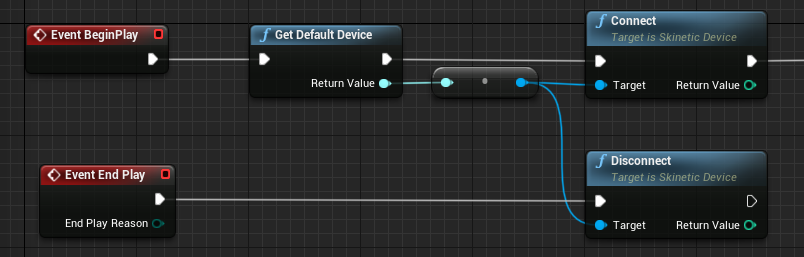
In the same way, this procedure can be handle in a C++ script:
auto Device = USkineticDevice::GetDefaultDevice();
Device->Connect();
Device->Disconnect();
A delegate is also available to call a custom event upon connection changes. OnConnectionStatusChangedCallback can be bound directly in blueprint or c++.
The connection cannot be performed if the scanning procedure is ongoing.
Setting a callback is an alternative to monitoring the connection state, but is not mandatory.
Stop/Pause All
All effects playing on the device can be paused, resumed or stopped completely from the device asset with PauseAll, ResumeAll and StopAll.
Device Introspection
Methods are provided to check or display device information such as SDK version (GetSDKVersion), Skinetic version (GetDeviceVersion), Skinetic device type (GetDeviceType) or Skinetic identifier (GetDeviceSerialNumber).
Global Boost Setting
Boost increases the overall intensity of all haptic effects. However, the higher the boost activation, the more the haptic effects are degraded.
We recommend that you make this parameter available to end users so that they can set the boost level themselves. Some users may set high values, while more sensitive users may turn it off.
GetGlobalIntensityBoost / SetGlobalIntensityBoost allows developers to retrieve or set the global Boost intensity.
Boost can also be set on pattern and effect instance levels. For more information, see Boost Guidelines section.
Skinetic Device Settings - Experimental mode
This mode allows you to use experimental features of the Skinetic SDK.
We recommend using these experimental features only for testing or experimenting and not to rely on them when deploying your solution.
They might as well be fully integrated into the main API or completely removed at some point.
Skinetic Device Overview - Experimental mode
With the Experimental connection mode selected, Skinetic Device asset, specific actions are replaced:
- Device instrospection and configuration
- Handle connection to a Skinetic device
Differences with the Classic connection mode are:
- Rendering state handling (stop/pause/resume) remains the same
- Scan procedure is fully replaced by device introspection/configuration
- Connect by Serial Number is not available (
ConnectToSpecificDevice()) - Connection Callback will replace serial number information by
-1
Experimental Configuration
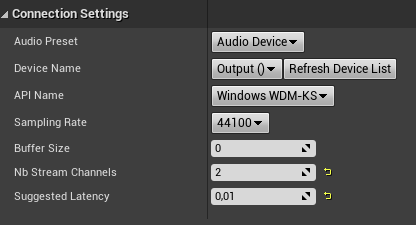
Configuration of the device can be done directly in the Skinetic Device asset details panel or by calling a set of methods (either in C++ or Blueprint).
Audio Preset: choose from predefined presets for specific devices (Skinetic, HSD0, HSD-mkI and HSD-mkII) or configure settings manually with the Audio Device optionDevice Name: Name of the targeted audio device (to pick from available audio devices on the system)API Name: Name of the targeted audio API to choose from available options for the selected device.Sampling Rate: Sample rate of the audio stream.Buffer Size: Size of a chunk of data sent over the audio stream.Nb Stream Channels: Number of channels to use while streaming to the haptic output.Suggested Latency: Desired latency in seconds (value is rounded to the closest available latency value from the audio API).
In the details panels, the Refresh Device List is available to refresh the list of available audio devices.
TODO: add configuration by blueprint screenshots
Runtime configuration of the device will replace settings in the Skinetic Device asset set as default in the plugins settings.
Experimental Connection
Haptic Feedbacks
Two classes are provided for the management of haptic feedback. Skinetic Pattern is an asset handling the .spn pattern and simple commands. Skinetic Effect is an actor component designed for a more complex management of effect instances, the way they will be played and their alteration parameters.
Skinetic Pattern Asset
Every pattern created with Unitouch Studio can be used directly in Unreal. Dragging the .spn file in the content browser will convert it to a Skinetic Pattern Data Asset.
Once loaded (regardless of the method, such as using the asset manager or a hard reference in a blueprint), this asset can be directly used to play effects from any script or blueprint.
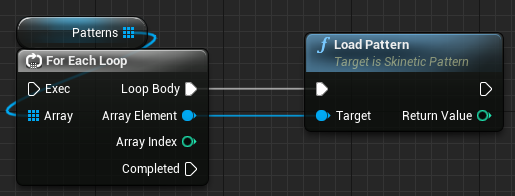
Load/Unload
All patterns to be played must be loaded beforehand into the sdk and unloaded once all interactions are completed (eg. while the game is stopping).
This has to be done with the LoadPattern and UnloadPattern methods.
Example: Patterns is an array of Skinetic Pattern object references.
Play/Stop
The pattern can be played directly from the asset.
A PlayEffect method/node, taking multiple parameters to fine-tune the effect, is available.
It returns a positive integer representing the ID of this effect instance (and an error code if something was wrong).
This ID must be saved to be able to stop the effect when needed.
It will be used as a parameter in the StopEffect node/method.
The state of the effect instance can be checked at any time, providing its ID to the method EffectState.
To ease the process, a Skinetic Effect Component is available, allowing automatic handling of effect instances and their parameters.

For the details of play parameter Effect Properties, see Parameters.
Drag & drop of a .spn is the only way to create a functional Skinetic Pattern. Creation from the Data Asset menu will result in an empty and non-editable pattern.
Skinetic Effect Component
This class is conceived as an actor component to handle one or multiple instances of a single Skinetic Pattern. It can be added on any blueprint as a component.
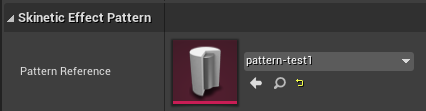
Pattern Reference
In order to operate, a reference to the pattern to play has to be set in the details panel.
Parameters
Several parameters are available to modify the way the effect will be played.
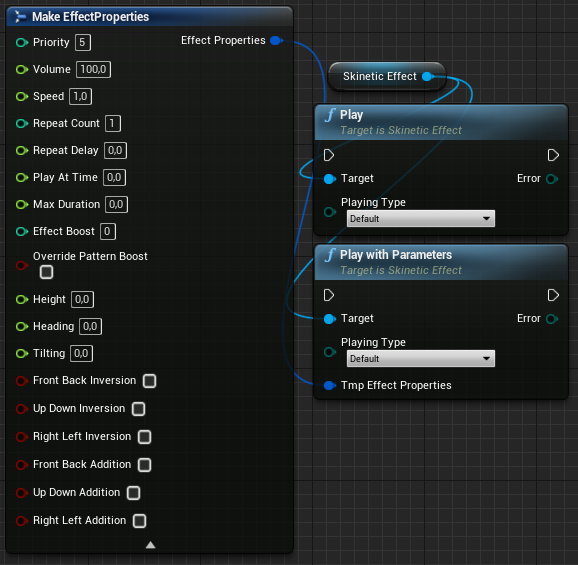
These parameters are grouped in a structure and can be modified directly in the effect details view, by splitting it in the Play Effect node or by using the Make Effect Properties node.
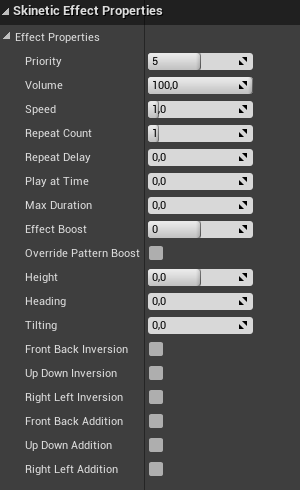
- Priority - int: level of priority of the effect (from 1 to 10, 1 being the highest priority)
- Volume - float: percentage of the base volume between [0; 250]%.
- Speed - float: time scale between [0.01; 100]
- Repeat Count - int: number of repetition of the effect.
- Repeat Delay - float: pause in seconds between two repetitions of the effect.
- Play At - float: time in second to start the pattern at.
- Max Duration - float: maximum duration in seconds of the effect (regardless of the repeat count).
- Effect Boost - int: Boost intensity volume for this effect instance if Override Pattern Boost is set to true. By using a negative value, can decrease or even nullify the global intensity boost set by the user. [-100; 100]
- Override Pattern Boost - boolean: Whether or not to use the local boost setting over the default pattern defined setting. default: false
- Height Translation ** - float: Height in meter to translate the pattern.
- Heading Rotation ** - float: Heading angle in degree to rotate the pattern in the horizontal plan (y axis).
- Tilting Rotation ** - float: Tilting angle in degree to rotate the pattern in the sagittal plane (x axis).
- Front Back Inversion - boolean: Invert the direction of the pattern on the front-back axis. Can be combined with other inversion or addition. (default - false)
- Up Down Inversion - boolean: Invert the direction of the pattern on the up-down axis. Can be combined with other inversion or addition. (default - false)
- Right Left Inversion - boolean: Invert the direction of the pattern on the left-right axis. Can be combined with other inversion or addition. (default - false)
- Front Back Addition - boolean: Perform a front-back addition of the pattern on the front-back axis. Overrides the Front Back Inversion. Can be combined with other inversion or addition. (default - false)
- Up Down Addition - boolean: Perform an up-down addition of the pattern on the up-down axis. Overrides the Up Down Inversion. Can be combined with other inversion or addition. (default - false)
- Right Left Back Addition - boolean: Perform a right-left addition of the pattern on the right-left axis. Overrides the Right Left Inversion. Can be combined with other inversion or addition. (default - false)
For more information on Boost best pratices, see Boost section.
Transform parameters (height, heading and tilting) are only compatible with shape-based patterns. If set with actuator-based patterns, no transformation will be applied. For more information, see Effect Transformation section.
Play/Stop
To play the effect, two methods are available: both take a playing type as the first parameter.
Playing type is an enum that permits to choose between 3 playing modes:
- Default will play the effect only if it is not already playing,
- Force will stop any instance of the effect before playing,
- Pool will play an instance of the effect regardless of the effect’s state - several instances can be played simultaneously.
PlayPlay the effect with the parameters set in the details panel.PlayWithParametersPlay the effect with parameters that will not be saved in the component.
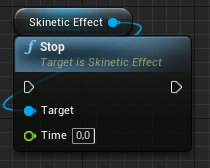
As in the Skinetic Pattern asset, Stop and EffectState methods are provided to stop the effect or check its state (both concern any instance of this effect regardless of the playing type chosen).
StopStop the effect instance with a fade-out of duration defined by the Time argument (in seconds).
Effect Priority Levels
See Haptic Guidelines about Haptic Confusion Mitigation
Effect Transformation
When an effect is played, an instance of a pattern is created. If this pattern is shape-based, it can then be transformed using the three transformation parameters: Height Translation, Heading Rotation and Tilting Rotation.
The three transformations are applied in this order:
- tilting,
- heading,
- height translation.
The default position of a pattern is the one obtained when these three parameters are set to zero.
There are no actual bounds to the angles as not to restrict the usage.
The height is normalised between 1 and -1, when computing the translation, it has to be rescaled to fit your interaction, e.g. the actual size of the avatar.
The actual use of these 3 parameters depends on the default position of the pattern and the targeted interaction. For example:
- For a piercing shot, a heading between [-180; 180]° can be combined with a tilting between [-90; 90] when using a shape-based pattern centered in the middle of the torso.
- For an environmental effect, a heading between [-90; 90]° (or [-180; 180]°) can be combined with a tilting between [-180; 180]° (resp. [-180; 0]°) when using a pattern with shapes centered on the top.
In addition, some mirrored operations are also available for shape-based patterns: with 3 inventions FrontBackInversion, UpDownInversion, RightLeftInversion, and 3 additions FrontBackAddition, UpDownAddition, RightLeftAddition.
Boost Guidelines
See Haptic Guidelines about Boost Design
Effect Accumulation Strategy
See Haptic Guidelines about Effect Accumulation
To enable this feature, call the SkineticPattern::SetAccumulationPattern method with the default pattern, fallback pattern, a time window and max accumulation. The two patterns must be previously loaded in order to be successfully registered together.
Errors & Logs
Most calls to the Skinetic SDK return negative error codes when issues arise. In some cases, the method node displays a second output pin returning the error.
In addition, the Skinetic SDK also logs some information as it is running. On Windows, logs can be found in the SkineticSDK.log file (next to the dll) which is overridden after each session. On Android, the logs are added to the logcat under "SKINETICSDK".