Manual
SkineticDevice Component
To enable haptic feedback using the Skinetic SDK, the first step is to set up a Skinetic device to connect to.
SkineticDevice component overview
The SkineticDevice component serves as the interface to the haptic rendering layer. It also abstracts the target platform of your project: developing an application for android, is the same as for windows.
This component allows you to perform several kinds of actions:
- Scan available devices
- Handle connection to a Skinetic device
- Introspect the current device details
- Control the device’s global rendering state
- Handle the Global boost
- Manage the haptic feedback: this point will be fully detailed in a dedicated Haptic Feedback section

The SkineticDevice component can be added to a gameobject from the menu following Skinetic → Skinetic Device.
Scanning procedure
A Skinetic device is uniquely identified by its serial number, independently of the connection protocol. To connect to a specific Skinetic device, the serial number is required. It can be obtained by scanning the available devices.
The SkineticDevice component provides 3 methods to handle the asynchronous scanning procedure:
ScanDeviceswill start an asynchronous scanning procedure for all devices available with the connection type requested.ScanStatusreturns the status of the scanning procedure or an error code.GetScannedDevicesreturns a list of devices to which it is possible to connect with, once the scanning procedure is complete.
The scanning procedure returns the list of all available devices using a DeviceInfo structure containing: the supported OutputType, the Serial Number, the Device Type and the Device Version of the embedded software. The same device can appear several times in the list if it is available through different connection protocols.
The scanning procedure cannot be performed if the component is already connected.
Connection handling
The SkineticDevice component displays means to manage the connection to an actual Skinetic device. The connection procedure is also asynchronous. To connect to a specific device, its serial number is required. However, it is possible to also connect to any skinetic device available.
The connection can be established through USB, Bluetooth or WiFi. Once connected, the communication channel has no impact on the commands that can be given through this component.
The SkineticDevice component provides 4 methods to handle the asynchronous scanning procedure:
Connectwill start the asynchronous connection procedure.Disconnectwill start the asynchronous disconnection routine. The disconnection is effective once all resources are released.ConnectionStatusreturns the current connection status to monitor the connection or disconnection procedures.SetConnectionCallbackSet a callback function delegate that is fired upon connection state changes. The callback is triggered at the end of the connection or disconnection procedure.
The connection cannot be performed if the scanning procedure is ongoing.
Setting a callback is an alternative to monitoring the connection state, and is not mandatory. The callback is not executed by the main thread. Hence, the actions that can be performed by it are restricted by Unity.
Device Introspection
From a SkineticDevice component that is already connected to a Skinetic device, several methods are provided to check or display device information such as SDK version (GetSDKVersion), Skinetic version (GetDeviceVersion), Skinetic device type (GetDeviceType) or Skinetic serial number (GetDeviceSerialNumber).
Global Rendering State
The rendering of the device can be controlled with PauseAll, ResumeAll and StopAll. These calls affect all playing effects on the device, by pausing/resuming them or even stopping and deleting all of them, freeing all resources.
Global Boost Setting
A global parameter is exposed and can be get and set through scripting (GetGlobalIntensityBoost and SetGlobalIntensityBoost). The boost increases the overall intensity of all haptic effects. However, the higher the boost activation is, the more the haptic effects are degraded.
We recommend exposing this parameter to the end-users so they can fix the boost level themselves. Some users might set high values while more sensitive ones might disable it.
More information about the boost strategy can be found in the global haptic guidelines about boost design.
Haptic Feedback
The haptic feedback is based on:
- Pattern Asset ScriptableObjects that can handle .spn patterns.
- HapticEffect components that can create and manage a parametric instance of the pattern.
PatternAsset
Patterns are descriptors of sequences of haptic samples that can be created using Unitouch Studio, while haptic effects are the actual feedback rendered using the sequence descriptor.
Every pattern created with Unitouch Studio can be used directly in Unity. Dragging the .spn file in the project window will automatically convert it to a PatternAsset ScriptableObject. These assets are then available for your project. This ScriptableObject has two fields: a Name that you can use to identify it and a json that the Skinetic SDK is able to process.

Load / Unload: All patterns to be played must be loaded beforehand into the connected device and unloaded once all interactions are completed (eg. while the game is stopping). A
PatternAssetcan be loaded and unloaded on the fly with theLoadPatternandUnloadPatternmethods of theSkineticDevicecomponent.PreLoad: The
SkineticDevicecomponent also has aPatternToPreloadpublic field which is a list of patterns that will be loaded during theOnEnableevent.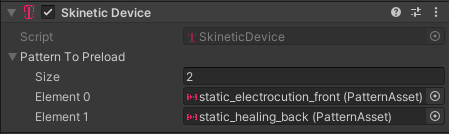
LoadedPatterns: A read-only list of all loaded patterns is available on the
SkineticDevicecomponent.Accumulation Strategy: The effect accumulation strategy can be enabled with
SetAccumulationWindowToPattern: Whenever an effect is triggered on the primary pattern, the fallback one is used instead. More information can be found in Haptic Guidelines about Effect Accumulation. It can be disabled withEraseAccumulationWindowToPattern
HapticEffect Component
HapticEffect components handle actual instances of PatternAsset. They provide several basic features:
Pattern Reference
In order to operate, a reference to a PatternAsset to play has to be set either in the inspector or through scripting under the field TargetPattern. An Haptic Effect is an instance of a Pattern.
StrategyOnPlay
When the effect is triggered, several PlayStrategies are available:
Default: By default, an effect can only play once. While it is playing, any call toPlayEffect()is ignored.Forced: Immediately stop the current playing instance and start a new one.Pulled: Each time the effect is triggered a new independent instance of the effect starts.
Play Parameters
Several parameters are available to modify the way the effect will be rendered when triggered. These parameters can be set in the inspector or through scripting as there are exposed as the HapticEffect component's public properties. Any modification to a property is taken into account the next time the haptic effect is triggered.
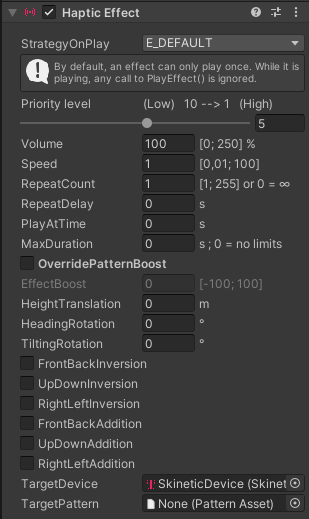
These properties are set using the underlying EffectProperties structure that can also be directly accessed and overridden through the Properties field.
Stop Parameter
Once the effect is stopped, it will fade out from the current volume to 0 in the “fadeout” duration. The effect can still finish on its own earlier.
Play / Stop
HapticEffect can be triggered and interrupted with play and stop commands. It is also possible to check the state of an effect to determine if it is still playing or if it has been muted (see next section). To trigger a haptic effect, two workflow are available:
- From HapticEffect component: If the
HapticEffectcomponent has a reference to a targetSkineticDevicecomponent,PlayEffect,StopEffect, andGetEffectStatecan be called from theHapticEffectcomponent. - From SkineticDevice component:
PlayEffect,StopEffect, andGetEffectStateare called from aSkineticDevicecomponent by passing a reference to anHapticEffectcomponent that needs to be triggered.
Effect Priority Levels
See Haptic Guidelines about Haptic Confusion Mitigation
Effect Transformation
When playing an effect, an instance of a pattern is created. If this pattern is shape-based, it can then be transformed using the three transformation parameters: Height Translation, Heading Rotation and Tilting Rotation.
- The three transformations are applied in this order: tilting, heading, height translation.
- The default position of a pattern is the one obtained when these three parameters are set to zero.
- There are no actual bounds to the angles as not to restrict the usage.
- The height is normalized between 1 and -1, when computing the translation, it has to be rescaled to fit your interaction, e.g. the actual size of the avatar.
The actual usage of these 3 parameters depends on the default position of the pattern and the targeted interaction. For example:
- For a piercing shot, a heading between [-180; 180]° can be combined with a tilting between [-90; 90] when using a shape-based pattern centered in the middle of the torso.
- For an environmental effect, a heading between [-90; 90]° (or [-180; 180]°) can be combined with a tilting between [-180; 180]° (resp. [-180; 0]°) when using a pattern with shapes centered on the top.
In addition, some mirrored operations are also available for shape-based patterns: with 3 inversions frontBackInversion, upDownInversion, rightLeftInversion, and 3 additions frontBackAddition, upDownAddition, rightLeftAddition.
Boost Guidelines
See Haptic Guidelines about Boost Design.
Effects Accumulation
See Haptic Guidelines about Effect Accumulation.
Errors & Logs
Most call the Skinetic SDK returns negative error codes when issues arise, you can check the corresponding error with Skinetic.SkineticDevice.getSDKError().
In addition, the Skinetic SDK also logs some information as it is running. The logs can be found in the /SkineticLogs/SkineticSDK.log files which are permuted after each session (the lower number correspond to the most recent one). On Android, the logs are added to the logcat under SKINETICSDK.
Examples
Several sample scenes are available in the plugin. To import them into your project open the package manager under Windows → Package Manager. In the dropdown menu, select either In Project or Custom, you will see the Skinetic SDK package appear in the list below. Within the package description, an import button allows you to import the sample scenes into your project.
Experimental Audio Connection
An experimental feature allows to connect to a audio device instead of Skinetic. The audio output device will then renderer the haptics signals exactly as the Skinetic device would.
This feature is not available for Android.